1. Initialize: Input and Output for SASSI
Note
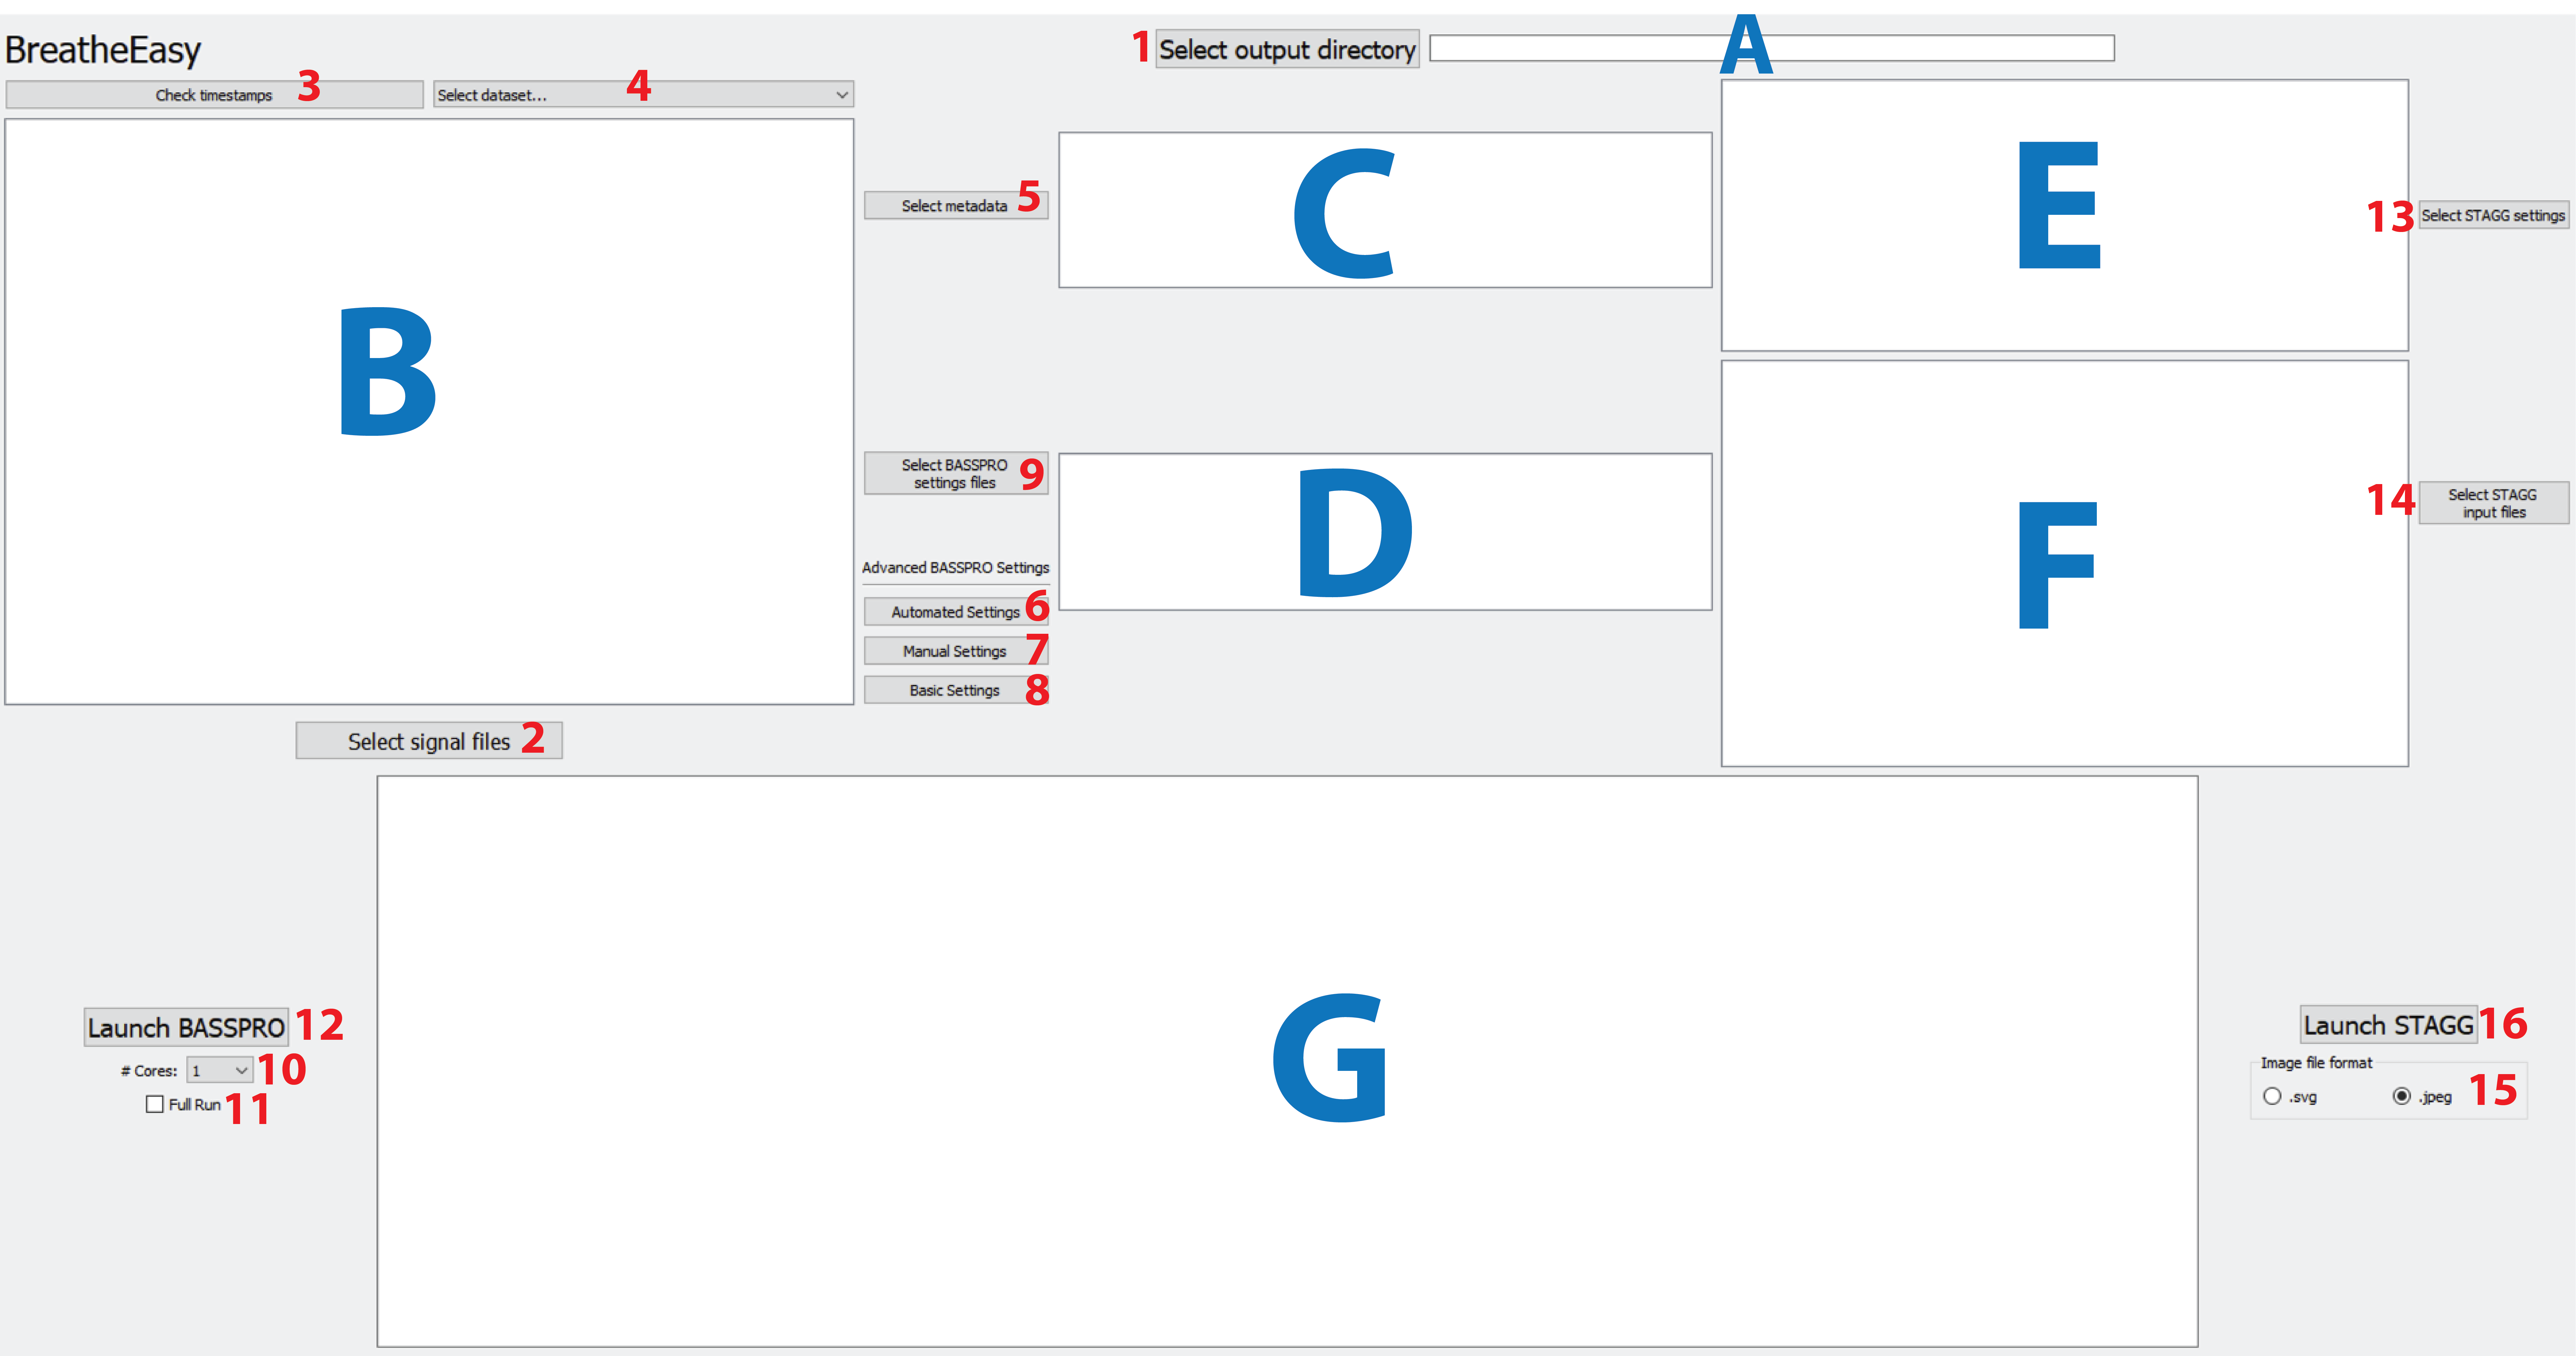
We recommend opening the below figure of the GUI as you go through the instructions. The labels on this figure are used throughout the documentation to point you to the correct buttons and windows.

Figure 2 Screenshot of the main GUI screen with labels on buttons and windows.
1.1. Select Input files and and Output folder
- Choose the folder where you would like your SASSI-STAGG output for the current session saved.
Click the
Select output directorybutton (1) to navigate through the File Finder display and select your desired folder.The file path for your selected output folder will be displayed in window (A).
- Choose the converted .txt signal files you would like analyzed.
Click the
Select signal filesbutton (2) and navigate through the file dialog to select the files you would like to analyze.If you have signal files in more than one folder, simply follow the instructions iabove, then repeat. A popup will appear that asks, “Would you like to remove the previously selected signal files?”. Click “No” and this will keep your previously selected text files and add the new selection of text files.

Figure 3 Popup when selecting signal files from multiple folders.
A file path for each signal file you have selected for this run will be displayed in window (B). You can scroll up and down, if your list is longer than the display screen, to verify all the files you want to analyze are present in the list before proceeding.
2. Optional Data Validation
2.1. Timestamp Review
SASSI relies on a set of recognized timestamps (called comments in LabChart) to apply different settings to different sections of the run. SASSI will not work if it does not recognize the timestamps of the signal files provided as input. The user can check these timestamps via the GUI by selecting the signal files they would like to review. In the drop-down menu (4), the user must choose which type of experiment was run, thus selecting a set of timestamps to compare to those found in the selected signal files. The options in this dropdown are default values based on the standards of commenting in our lab. If your comments are different from our defaults, then you can create your own reference file for this function. Click the Check timestamps button (3), when you have the appropriate experiment type selected, to run the timestamp review. This process does take some time to complete but will produce update comments in the main terminal window (G), so you know it is working.
The GUI will be unresponsive while checking timestamps. Once complete, a summary of the review is printed to the main terminal window (G), as well as the path to the file where the full review results are saved. Three main categories of mismatch are highlighted by the timestamp review, and these categories are not mutually exclusive. As an example, take a signal file for a 5% Hypercapnia experiment with the following comments:
CAl 20 Room Air
Cal 20 5% CO2
Room Air
5% CO2
Room Air
The series of timestamps recognized by SASSI for 5% Hypercapnia is as follows:
Cal 20 Room Air
Cal 20 5% CO2
Room Air
5% CO2
Room Air 2
This signal file will be included in 1) the list of files missing timestamps because it has no Room Air 2; 2) the list of files with duplicate timestamps because it has two Room Air comments; and 3) the list of files with novel timestamps because CAl 20 Room Air has a capital letter that should be lowercase.
There are different ways to handle each of these errors as outlined below.
2.1.1. Missing timestamps
Missing timestamps can be ignored as long as you do not want to include that period in your recording or if you did not record that part of the experiment. For example, if you only record baseline room air followed by an exposure to 5% CO2, then you will not have a “Room Air 2” section. This would be by design as it is not included in your protocol, so this timestamp missing is not an issue. You will simply not have data produced for this period. However, if the missing timestamp is a calibration period, then you will not get refined variable calculation for that signal file.
2.1.2. Duplicate timestamps
All duplicate timestamps MUST be resolved and, currently, there is only one way to resolve them.
Open the designated file in LabChart, or your recording software of choice.
Delete or rename the comment that is not indicative of the desired period of the recording.
For example, if you accidentally entered two comments for calibration injections where the first set of calibration injections did not come out correctly, then you would delete the first comment for calibration and keep the second.
Save the corrected file.
Re-export the corrected file into a text format and save it over the previous version.
This will make the existing file path the same as the file path for the corrected text file.
2.1.3. Novel timestamps
There are two ways to handle novel timestamps. You should note, however, that while novel timestamps are often flagged because of typos, some describe valid timepoints that simply do not match the recognized defaults. Check your files with the results of the timestamp check to determine which is your case.
2.1.3.1. Manually Change in Signal File and Re-export
Open the designated file in LabChart, or your recording software of choice.
Rename the comment that is with the typo.
Save the corrected file.
Re-export the corrected file into a text format and save it over the previous version.
This will make the existing file path the same as the file path for the corrected text file.
2.1.3.2. Adjust your Automated Settings File
Use our custom automated settings derived from your signal files as described in Deriving Settings from Signal Files – with and without modifications.