3. Metadata Generation
There are two ways to load in animal and experimental metadata. Both are described below, but for users outside of the Ray lab only the manual configuration will work. The method using FileMaker is currently specific to our internal LIMS database but could be manipulated to handle other LIMS systems in the future. This modification is not part of the initial release of Breathe Easy. However, as this is an open-source software, it is possible for other users that are familiar with coding to make the required modifications for their specific LIMS systems allowing for automation of this process.
No matter which way you load your data in, the Metadata subGUI will open upon loading of the data and will allow you to make edits to variable names and grouping. See Metadata Configuration subGUI for more information.
3.1. Manual Entry
Open the template “metadata.csv” file found
here.Note
The template contains column headings for all REQUIRED metadata for your run. You can add more columns to analyze other variables that you may have recorded, but you cannot delete any of the columns included. For an example of the format of the data used to fill in this sheet, you can see the example metadata sheet
found herethat is provided for our vignette.Replace all placeholders with your respective metadata.
Note
Some fields are required for a successful run of SASSI-STAGG and these fields are bolded in the provided “metadata.csv” file. These fields are required for each run included in the experiment and are enumerated in the table below.
Required Variable Name
Description
MUID
MUID is a unique ID number for each animal
PlyUID
PlyUID is a unique ID number for each plethysmography run
Weight
Body weight at time of recording in grams
Start_body_temperature
Body temperature at beginning of recording in Celsius or Fahrenheit. Celsius is preferred, but SASSI is programmed to detect Fahrenheit temperature values and perform a conversion to Celsius automatically.
Mid_body_temperature
Body temperature roughly in the middle of the recording, typically only in experiments where a drug is injected during the recording. This column is not required, but should be completed where applicable.
End_body_temperature
Body temperature at the end of the recording in Celsius or Fahrenheit. Celsius is preferred.
Room_temp
Temperature of the room in which the recording is performed at the time of the recording in Celsius or Fahrenheit. Celsius is preferred.
Bar_Pres
Barometric pressure of room in which the recording is performed at the time of the recording in millimeters of mercury (mmHg).
Rotometer_Flowrate
Flow rate as it reads on the rotometer. A default value is used if this is left blank in any or all recordings in an experiment.
Calibration_Volume
The amount of air injected at the beginning of a recording to calibrate the system in microliters (uL).
Once you have added all metadata, save the file in a known location.
Click
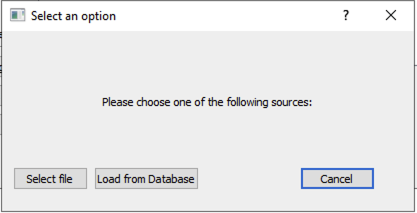
Select metadatabutton (5) to reveal the pop-up in Figure 4.
Figure 4 Popup when loading metadata that displays loading options.
Click
Select fileand navigate to the location of your saved metadata.csv file.Select your file and click ok.
See Metadata Configuration subGUI for variable annotation, which will automatically popup once you have selected your file.
When your file is successfully loaded, you will see a red box with an X appear next to the
Select metadatabutton (5), see Figure 5.If you would like to remove this file and add a new one for your analysis, click the X and repeat steps 4-6.

Figure 5 Appearance of button 5 and window C following a successful loading of metadata.
The file path to your selected file will appear in window (C).
3.2. Automated Pull of Data using LIMS System
- Once you have your .txt files loaded, click the
Select metadatabutton (5) and chooseLoad from Databasefrom the popup shown in Figure 4. Note
This will ONLY WORK if you have correctly named all of your files as MUID_PlyUID.txt.
Note
If you use this method of loading in metadata, there will be no file path in window (C). This is normal.
- Once you have your .txt files loaded, click the
All rules for the units of given variables also apply to using this method. So, be sure to enter your values carefully into the database.
4. Metadata Configuration subGUI
Immediately after metadata is loaded either from a manually generated metadata file or from the database, a subGUI opens where the user can more easily manipulate the metadata and configure it to match their needs. Continuous variables can be systematically divided into categories; categorical variables can be condensed; overly detailed labels can be simplified. You can also rename variables to match what you would like to see on your graphs.
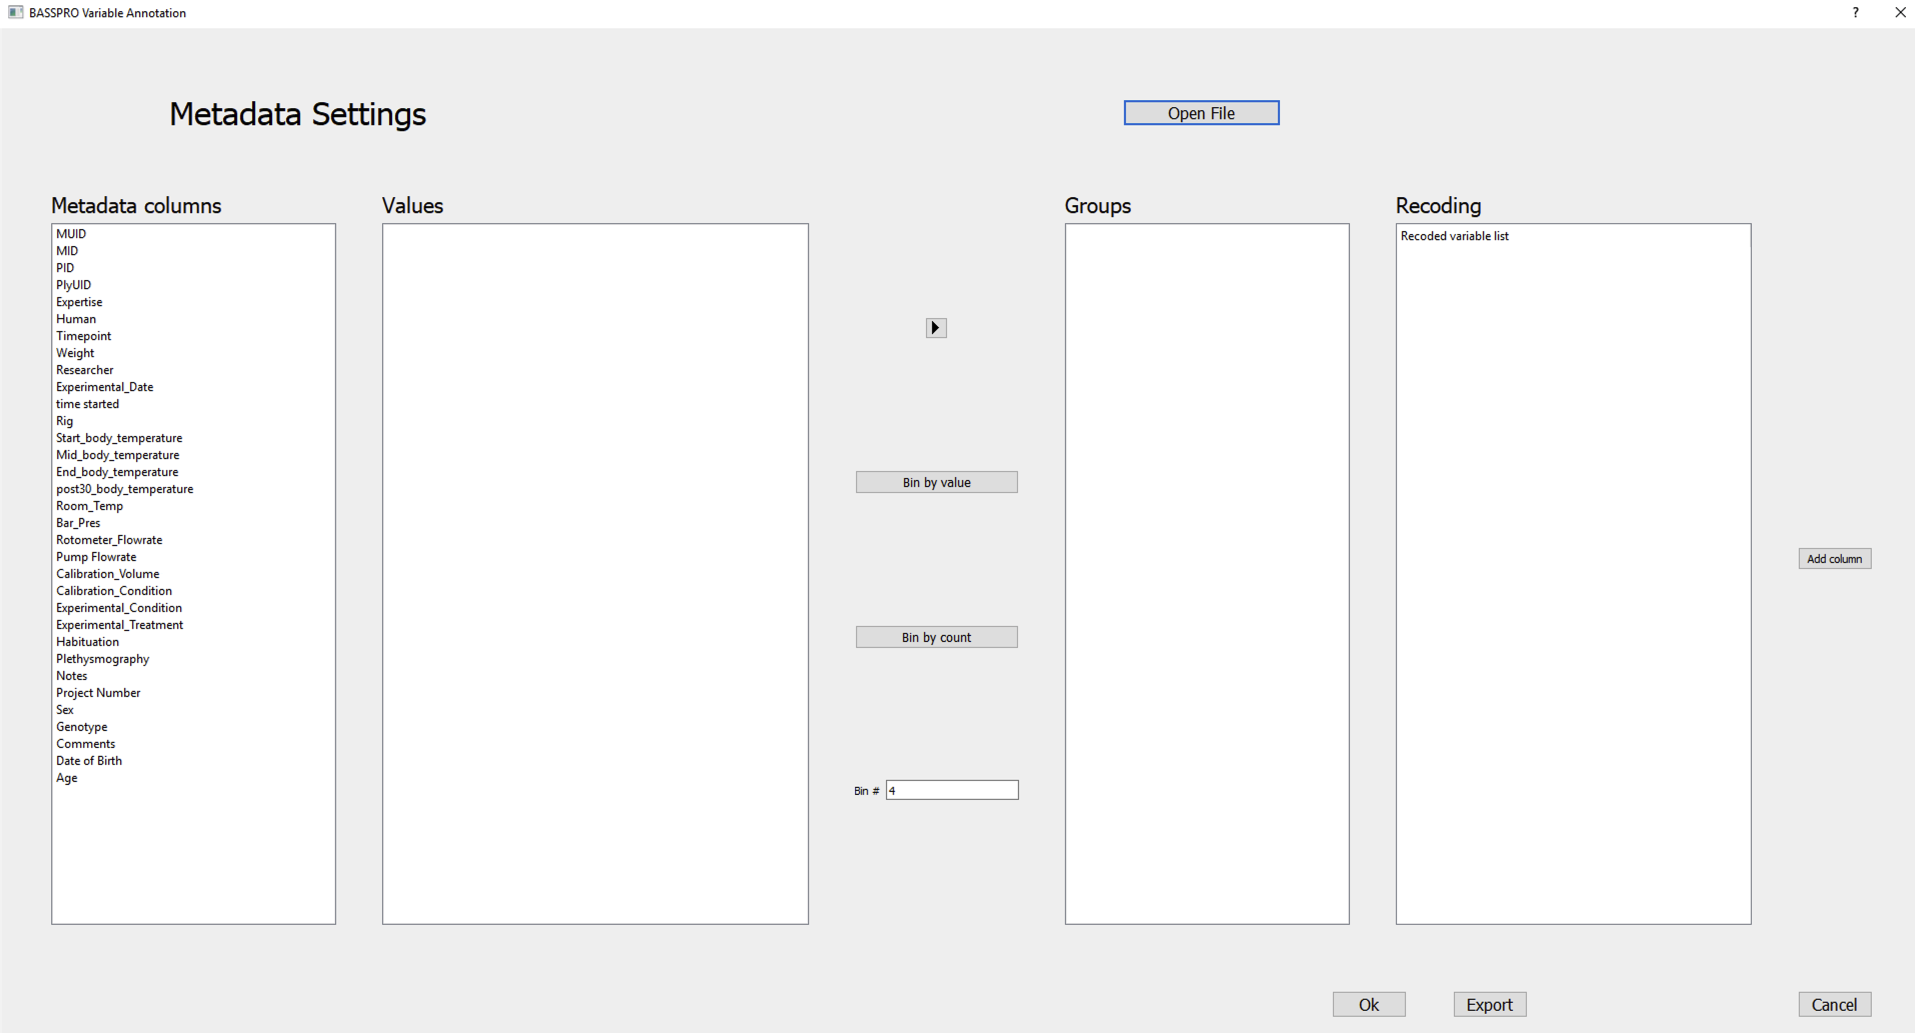
Load your metadata as described above (See Manual Configuration of Metadata or GUI Configuration of Metadata via FileMaker) to trigger the Metadata Configuration subGUI to open (Figure 6).

Figure 6 Metadata configuration subGUI.
The Metadata columns panel automatically populates with the columns of the metadata file provided, i.e., the available metadata variables.
Clicking one of the items in the Metadata columns panel will populate the Values panel with all the unique values for the selected variable sorted in alphabetical or ascending order for categorical and continuous variables.
Select a variable to configure.
- Assign values to groups/ bins. There are two ways to group or bin values:
Note
The current function of this subGUI only allows one attempt to select all variables for each group. For example, you must select every value that you want included in your first group and then bin within leaving any behind or including unwanted values. If a mistake is made, the only fix is to start over again. More flexibility in the assignment of manual bins is anticipated in the future./
Manual binning: works with either categorical or continuous variables
Select all the values in the Values panel that you want in the first bin. Use either shift to select consecutive items or control to select scattered items, then click the → button.
Do this for however many bins you would like to divide the values into.
The bins will show up in the Groups panel as Group 1, Group 2, etc.
You can edit the text in the Groups panel to rename the categories.
The Recoding panel is view-only but allows you to confirm your bin selections. It displays all the items within the selected variable, not just the unique values.
If you make a mistake in selecting values from the Values column to add to a particular bin, the only way to fix this right now is to start over. Select a different metadata column variable and then return to the one you would like to bin.
Automated binning: works only with continuous variables (for non-numeric data error during automated binning, see Non-numeric data identification in variable configuration)
The Bin # box at the bottom lets you set the number of bins that the selected variable’s values will be divided among. This number applies to automatic binning by value or count, but not manual binning.
The Bin by value button in the middle lets you automatically assign values to bins based on the range of values divided by the number of bins.
The Bin by count button below lets you sort each item based on the number of values divided by the number of bins.
All items with the same value fall into the same bin.
Any item that would have straddled bins are put into the downstream bin. For example, if there are 10 items binned into 2 groups and the 5th and 6th value are “5”, then both values will go to bin 2. This would mean there are only 4 values in Group 1 and 6 values in Group 2.
Automatic binning ignores missing data – when the new “metadata.csv” file is saved, the entry for those rows in the new column will be blank.
If you have missing data in the selected variable, the subGUI will ask to confirm that you want to continue binning despite missing data. If you continue sorting with the missing variable and do not correct the missing value, then the animal associated with the missing data will not be included in the final figure if that variable is used for graphing.
Automatic binning can handle missing values as discussed in iv, but any non-numerical items within an otherwise numerical variable will prevent automatic binning.
Dates and times are common offenders for having mixed data types.
There are two workarounds:
Use manual binning, which can be found above.
Change the data format of the offending column in the original “metadata.csv” file in Excel. Save the edited csv file and then reopen this amended metadata file in the metadata configuration subGUI.
Confirm variable configuration.
Click Add column at the righthand side of the window once satisfied with your configuration of that variable. You will see your new column added to the bottom of the Metadata columns panel.
The new column will automatically be named as ‘Original Variable Name_recode_1’. For example, if the variable you selected for configuration was ‘Weight’, then the newly configured column will automatically be named ‘Weight_recode_1’.
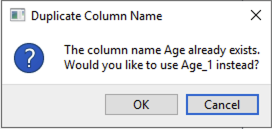
The text in the Metadata columns panel is editable, so you can rename variables. You cannot use the same name for two columns – if you do, then a popup will appear (Figure 7) asking if you would like to use VariableName_1 instead of VariableName for your newly renamed variable. Click OK to accept this change. If you click cancel, then the name will be reverted to the original variable name.

Figure 7 Popup to eliminate duplicated variable names in metadata.
If you want the variable name assigned to that variable to be the new name, change the old variable name to something else, then rename the variable as you did in Step 5b. You will no longer get the error message for duplicate names.
You will have a second opportunity to rename variables as they appear in figures in the STAGG settings subGUI as well. However, the same restrictions apply where each variable name must be unique.
Currently, we do not have a way of removing a configured column from the Metadata columns panel once it has been added. However, you can clear/reset your configuration of a particular variable at any point before clicking Add column by simply selecting a different variable in the Metadata columns panel.
Save the configured metadata file.
Click
OKto save your configured metadata in local memory – the actual csv file won’t be created until SASSI is launched.Click
Save Asto open a file dialog to save your metadata in a particular location for access later.Either option of saving will result in a copy of this “metadata.csv” file saved in the SASSI output folder for this run once launched.